
IT - BLOG - ADMIN
How to build multiple kickstart ISO/USB stick
Created: 04.09.2017
This tutorial describes how to rebuild an image of the CentOS distribution so that you can create multiple kickstart grub menu. Generated ISO IMAGE you can burn on CD/DVD or USB stick.
Step 1 - Prepare directories and download software
mkdir /tmp/centos_rw
mkdir /tmp/centos_ro

# Download software to build iso
sudo aptitude install xorriso

# Download lastest ISO CentOS 7
wget http://ftp.wcss.pl/pub/linux/centos/7/isos/x86_64/CentOS-7-x86_64-DVD-1611.iso -O /tmp/centos.iso
Step 2 - Mount ISO and copy files.
# Mount cd
sudo mount /tmp/centos.iso /tmp/centos_ro

# The directory is read only but we need to modify several files.
# Therefore, we will now copy /tmp/centos_ro to /tmp/centos_rw
sudo cp -R /tmp/centos_ro/* /tmp/centos_rw/
sudo chown -R myuser /tmp/centos_rw
After that step we have in /tmp/centos_rw directory all files extracted from ISO. We use it to build new modified image. Before we start, make some cleanup first:
sudo umount /tmp/centos_ro
rmdir /tmp/centos_ro
Step 3 - Let`s take a look at the structure of directories in unpacked ISO
# ls -all /tmp/centos_rw
total 320K
drwxr-xr-x  8 pyton pyton 4.0K Sep  5 21:18 .
drwxrwxrwt 17 root  root  4.0K Sep  5 21:26 ..
-rw-r--r--  1 pyton   502   14 Sep  5 21:22 CentOS_BuildTag
drwxr-xr-x  3 pyton   502 4.0K Jul  4  2014 EFI
-rw-r--r--  1 pyton   502  611 Sep  5 21:22 EULA
-rw-r--r--  1 pyton   502  18K Sep  5 21:22 GPL
drwxr-xr-x  3 pyton   502 4.0K Jul  4  2014 images
drwxr-xr-x  2 pyton   502 4.0K Jul  4  2014 isolinux
drwxr-xr-x  2 pyton   502 4.0K Jul  4  2014 LiveOS
drwxr-xr-x  2 pyton   502 248K Jul  5  2014 Packages
drwxr-xr-x  2 pyton root  4.0K Jul  5  2014 repodata
-rw-r--r--  1 pyton   502 1.7K Sep  5 21:24 RPM-GPG-KEY-CentOS-7
-rw-r--r--  1 pyton   502 1.7K Sep  5 21:24 RPM-GPG-KEY-CentOS-Testing-7
-r--r--r--  1 pyton root  2.9K Sep  5 21:24 TRANS.TBL
The most interesting directory for us is isolinux
# ls -all /tmp/centos_rw/isolinux
total 70M
drwxr-xr-x 2 pyton   502 4.0K Jul  4  2014 .
drwxr-xr-x 8 pyton pyton 4.0K Sep  5 21:18 ..
-r--r--r-- 1 pyton root  2.0K Sep  5 21:22 boot.cat
-rw-r--r-- 1 pyton   502   84 Sep  5 21:22 boot.msg
-rw-r--r-- 1 pyton   502  281 Sep  5 21:22 grub.conf
-rw-r--r-- 1 pyton   502  34M Sep  5 21:22 initrd.img
-rw-r--r-- 1 pyton   502  24K Sep  5 21:22 isolinux.bin
-rw-r--r-- 1 pyton   502 3.0K Sep  5 21:22 isolinux.cfg
-rw-r--r-- 1 pyton   502 173K Sep  5 21:22 memtest
-rw-r--r-- 1 pyton   502  186 Sep  5 21:22 splash.png
-r--r--r-- 1 pyton root  2.4K Sep  5 21:22 TRANS.TBL
-rw-r--r-- 1 pyton   502  32M Sep  5 21:22 upgrade.img
-rw-r--r-- 1 pyton   502 153K Sep  5 21:22 vesamenu.c32
-rwxr-xr-x 1 pyton   502 4.7M Sep  5 21:22 vmlinuz
In the /tmp/centos_rw/isolinux/isolinux.cfg file you will find the configuration for the bootloader.
This is where we modify the entries so that when you boot from our image you will see a multi-drop menu that
starts installation from kickstart. In addition, when you change the splash.png file, you can set your own bootloader logo.
Step 4 - Add example kickstarts and splash to image directory
wget http://www.pyton.systems/download/it/others/kickstart_sample.cfg -O /tmp/centos_rw/isolinux/ks1.cfg
wget http://www.pyton.systems/download/it/others/kickstart_sample2.cfg -O /tmp/centos_rw/isolinux/ks2.cfg
wget http://www.pyton.systems/download/it/others/splash_bsd_linux.png -O /tmp/centos_rw/isolinux/splash.png
Step 5 - Configure bootloader
Now we try to edit and add some positions in boot loader.
vim /tmp/centos_rw/isolinux/isolinux.cfgThe most interesting for us is a boot entry that looks like this:
label linux
  menu label ^Install CentOS 7
  kernel vmlinuz
  append initrd=initrd.img inst.stage2=hd:LABEL=CentOS\x207\x20x86_64 quiet
We will replace it by creating a boot configuration from two different kickstarts. This should look like that:
label linux
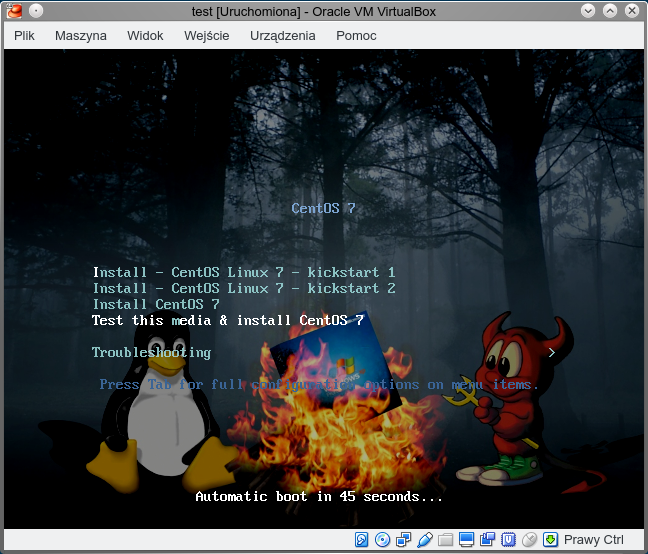
menu label ^Install - CentOS Linux 7 - kickstart 1
kernel vmlinuz
append initrd=initrd.img inst.stage2=hd:LABEL=CentOS\x207\x20x86_64 ks=hd:LABEL=CentOS\x207\x20x86_64:/isolinux/ks1.cfg
label linux
menu label ^Install - CentOS Linux 7 - kickstart 2
kernel vmlinuz
append initrd=initrd.img inst.stage2=hd:LABEL=CentOS\x207\x20x86_64 ks=hd:LABEL=CentOS\x207\x20x86_64:/isolinux/ks2.cfgPlease do not use ks=cdrom:/ks.cfg and other similar inventions. It is important to give the path through LABEL if we want our kickstart to be seen from either a DVD or a USB stick
Step 6 - Create ISO file
cd /tmp/centos_rw

xorriso -as mkisofs -o /tmp/centos_kickstart.iso -V "CentOS 7 x86_64" -isohybrid-mbr --interval:local_fs:0s-15s:zero_mbrpt,zero_gpt:"/tmp/centos.iso" -partition_cyl_align off -partition_offset 0 -c isolinux/boot.cat -b isolinux/isolinux.bin -no-emul-boot -boot-load-size 4 -boot-info-table -eltorito-alt-boot -e "/images/efiboot.img" -no-emul-boot -boot-load-size 12804 -isohybrid-gpt-basdat -R -J .
Step 7 - Test it
- Create VM with t least 50GB of disc (my kickstart needs that big storage), or change my example kickstart with your disc configuration.
- Generated ISO is at path /tmp/centos_kickstart.iso
- Boot from ISO
If everything is ok, you should see an image like this:
Code Europe 2017 - Largest programming conference in Europe
Created: 26.09.2017
A few months ago I was lecturing at one of Europe's largest developer conferences, about OSSEC, Volatility and SysDig and how to combine these technologies to debug applications other than traditional methods. The video of the lecture can be viewed on youtube (below), and the materials are available in the download section.